SUBHEAD: Experience of building first solar oven in Hanapepe in February 2011. Needs more work.
By Juan Wilson on 18 May 2011 for Island Breath -
(http://islandbreath.blogspot.com/2011/05/solar-ovens-part-two.html)
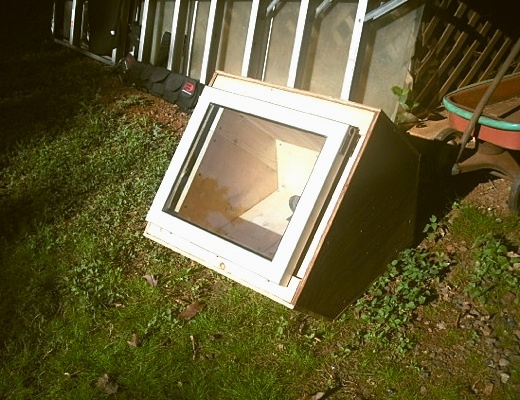
Image above: Prototype A. Greenhouse style solar oven in action. All photos by Juan Wilson.
As mentioned in Part One of this series, my goal was to build an insulated container that could be heated by solar radiation and hold that heat to provide slow cooking like a crock-pot. I wanted an oven that would last many seasons in a variety of weather conditions - this drove me away from using cardboard and aluminum foil construction material, even though the expense would be minimal and the the construction more complicated than just using a boxcutter and duct-tape. it also would make the oven heavier and bulkier.
The "heavier-and-bulkier" aspect was part of the reason I chose to build an oven that would only require horizontal rotation to follow the sun, and not have vertical adjustment as well. This was a major decision. It would make the oven less efficient at some period of the day, but make its construction and operation easier. If the unit was to have a fixed vertical angle to the sun, what should that angle be on Kauai? For the highest yield of solar energy the conventional rough rule of thumb was to set the angle of the opening equal to your latitude.
In other words, here in Hanapepe Valley that would be 22º above horizontal. The problem with this angle is that it is set to perform best at noon when the sun is highest in the sky. you get the most sun then but that angle will perform very badly early in the day (and more importantly), later in the day. It will also perform better in the summer than in the winter. Another criteria is to set the fixed angle of the solar oven opening to the sun at a pitch that will collect the most energy throughout the day as well as throughout the year. That ends up with quite a different result.
My conclusion was that is particularly true if when you want a hot cooked meal most is in the evening, in the winter. I looked to maximize first the winter performance. I found a site that suggested seasonal optimum orientation of solar voltaic panels (http://www.macslab.com/optsolar.html) with tables for various situations. it stated:
For Kauai that formula results in an angle of 44º. For simplicity of cutting parts to fir I adjusted that angle of the opening to 45º. This would maximize performance for mid to late afternoon when it is most likely I would be cooking. My tools, and readily available material at hand, guided me towards constructing a solar oven made of wood. I had read of problems people had with the taste of food when plastics (and some paints) were used inside the heated space of the oven. Initially decided to build a pine board box as the inner enclosure of the solar oven.
The Ace Hardware a mile away had pine boards for use as shelves. They come in a variety of sizes. I determined I needed a couple of 1"x8"x8' and a 1"x12"x4'. Pine boards for this purpose are plumb and true. With a little effort boards with no knot holes, warps, or major imperfections can be selected. My plan was to make an oven enclosure of about 14"x14"x14".
This was in part because of the size of the pine boards. It also would comfortably fit our black cast-iron "Dutch" oven pot. I like to use a portable electric drill and philip-head screws to put such projects together. Unlike hammering, which can be quite violent to a small job, using screws can allow you to "undo" a bad connection. Once a nail head is buried it can be a mess to retrieve it.
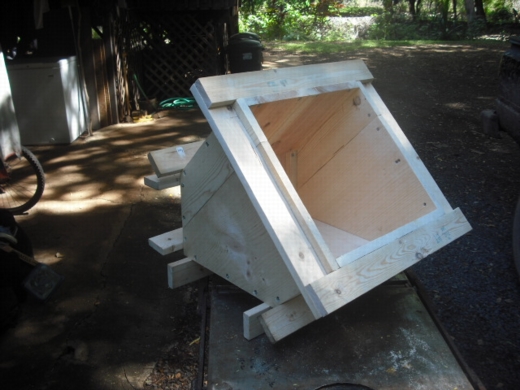
Image above: Pine board oven liner (14"x14"x14") held together with 1"x3" strips cut to 21".
Because I was building an insulated box I needed to connect the pine boards and provide separation between the inner oven and the outer "skin". I used 1.5" recessed philip-head screws. I used 1"x3"x8' douglas fir lumber all cut to length of about 21". these would both hold together the pine boards as well as separate them from the outer skin (for the insulation space) and provide the structural support for that skin.
That outer skin was 3/8" plywood. It was also screwed into the 1"x3" framing. The resulting squareness and accuracy of the outer skin was highly dependent on how true the pine and fir were assembled. I covered the outside joints of the pine boards with 1/4"x1" furring strips. The 1"x3" framing was laid out to make it easy to insulate the oven with a roll of 3" batt fiberglass. This material is cheap and easy to cut to size. Thinner and better performing material are available as well. As I was closing up the outer skin of the oven I stapled the paper of the insulation to the box.

Image above: Plywood oven skin screwed into 1"x3" framing. Note installed batt insulation on left and right walls.
I needed an insulated window for the open face of my oven. At the Hanapepe Transfer station I found an recycled small beverage refrigerator with a insulated two pane tempered glass door with rubberized seal. I removed the door from the unit and brought it home. This was my "Prototype A" solar oven. Itwas finished in late January of 2011.
Prototype A
On February 1st 2011 I tested the oven. See photo at top. It began sunny, but turned to occasional clouds between 9:30 and 11:00am. After an hour and a half my oven thermometer never got above 165º... not enough to warm a muffin. This oven worked miserably. I quickly learned three things
quickly followed.
See part three of this series on solar ovens.
See also:
Ea O Ka Aina: Solar Ovens - Part One 5/13/11
Ea O Ka Aina: Solar Ovens - Part Three 5/26/11
.
By Juan Wilson on 18 May 2011 for Island Breath -
(http://islandbreath.blogspot.com/2011/05/solar-ovens-part-two.html)
Image above: Prototype A. Greenhouse style solar oven in action. All photos by Juan Wilson.
As mentioned in Part One of this series, my goal was to build an insulated container that could be heated by solar radiation and hold that heat to provide slow cooking like a crock-pot. I wanted an oven that would last many seasons in a variety of weather conditions - this drove me away from using cardboard and aluminum foil construction material, even though the expense would be minimal and the the construction more complicated than just using a boxcutter and duct-tape. it also would make the oven heavier and bulkier.
The "heavier-and-bulkier" aspect was part of the reason I chose to build an oven that would only require horizontal rotation to follow the sun, and not have vertical adjustment as well. This was a major decision. It would make the oven less efficient at some period of the day, but make its construction and operation easier. If the unit was to have a fixed vertical angle to the sun, what should that angle be on Kauai? For the highest yield of solar energy the conventional rough rule of thumb was to set the angle of the opening equal to your latitude.
In other words, here in Hanapepe Valley that would be 22º above horizontal. The problem with this angle is that it is set to perform best at noon when the sun is highest in the sky. you get the most sun then but that angle will perform very badly early in the day (and more importantly), later in the day. It will also perform better in the summer than in the winter. Another criteria is to set the fixed angle of the solar oven opening to the sun at a pitch that will collect the most energy throughout the day as well as throughout the year. That ends up with quite a different result.
My conclusion was that is particularly true if when you want a hot cooked meal most is in the evening, in the winter. I looked to maximize first the winter performance. I found a site that suggested seasonal optimum orientation of solar voltaic panels (http://www.macslab.com/optsolar.html) with tables for various situations. it stated:
Optimum Tilt for Winter
The winter season has the least sun, so you want to make the most of it. To calculate the best angle of tilt in the winter, take your latitude, multiply by 0.89, and add 24 degrees. The result is the angle from the horizontal at which the panel should be tilted. This table gives the angle for some latitudes:
Latitude Angle % of optimum 25° (Key West, Taipei) 46.3° 81% 30° (Houston, Cairo) 50.7° 82% 35° (Albuquerque, Tokyo) 55.15° 84% 40° (Denver, Madrid) 59.6° 85% 45° (Minneapolis, Milano) 64.1° 86% 50° (Winnipeg, Prague) 68.5° 88%
For Kauai that formula results in an angle of 44º. For simplicity of cutting parts to fir I adjusted that angle of the opening to 45º. This would maximize performance for mid to late afternoon when it is most likely I would be cooking. My tools, and readily available material at hand, guided me towards constructing a solar oven made of wood. I had read of problems people had with the taste of food when plastics (and some paints) were used inside the heated space of the oven. Initially decided to build a pine board box as the inner enclosure of the solar oven.
The Ace Hardware a mile away had pine boards for use as shelves. They come in a variety of sizes. I determined I needed a couple of 1"x8"x8' and a 1"x12"x4'. Pine boards for this purpose are plumb and true. With a little effort boards with no knot holes, warps, or major imperfections can be selected. My plan was to make an oven enclosure of about 14"x14"x14".
This was in part because of the size of the pine boards. It also would comfortably fit our black cast-iron "Dutch" oven pot. I like to use a portable electric drill and philip-head screws to put such projects together. Unlike hammering, which can be quite violent to a small job, using screws can allow you to "undo" a bad connection. Once a nail head is buried it can be a mess to retrieve it.
Image above: Pine board oven liner (14"x14"x14") held together with 1"x3" strips cut to 21".
Because I was building an insulated box I needed to connect the pine boards and provide separation between the inner oven and the outer "skin". I used 1.5" recessed philip-head screws. I used 1"x3"x8' douglas fir lumber all cut to length of about 21". these would both hold together the pine boards as well as separate them from the outer skin (for the insulation space) and provide the structural support for that skin.
That outer skin was 3/8" plywood. It was also screwed into the 1"x3" framing. The resulting squareness and accuracy of the outer skin was highly dependent on how true the pine and fir were assembled. I covered the outside joints of the pine boards with 1/4"x1" furring strips. The 1"x3" framing was laid out to make it easy to insulate the oven with a roll of 3" batt fiberglass. This material is cheap and easy to cut to size. Thinner and better performing material are available as well. As I was closing up the outer skin of the oven I stapled the paper of the insulation to the box.
Image above: Plywood oven skin screwed into 1"x3" framing. Note installed batt insulation on left and right walls.
I needed an insulated window for the open face of my oven. At the Hanapepe Transfer station I found an recycled small beverage refrigerator with a insulated two pane tempered glass door with rubberized seal. I removed the door from the unit and brought it home. This was my "Prototype A" solar oven. Itwas finished in late January of 2011.
Prototype A
On February 1st 2011 I tested the oven. See photo at top. It began sunny, but turned to occasional clouds between 9:30 and 11:00am. After an hour and a half my oven thermometer never got above 165º... not enough to warm a muffin. This oven worked miserably. I quickly learned three things
- This particular insulated tempered glass filtered out too much light.
- The raw pine boards neither absorbed and held heat, or reflected it on the target.
- The oven opening was not gathering enough light. it needed relecttors.
quickly followed.
See part three of this series on solar ovens.
See also:
Ea O Ka Aina: Solar Ovens - Part One 5/13/11
Ea O Ka Aina: Solar Ovens - Part Three 5/26/11
.
2 comments :
Very cool- let me know when you get it down. Gottobesmooth.
Aolha Gottobe,
I have one more variation I want to test and then I will move on to a wood burning oven project.
Cook on!
Post a Comment